The Lichking challenge
I created this challenge for the Blizzard 2017 CTF competition that took place on 11/05/2017 in the eSports Arena in Santa Ana, Orange County, CA.
(https://ctftime.org/event/487). After the CTF event was over, I decided to release it to public and see who can crack it.
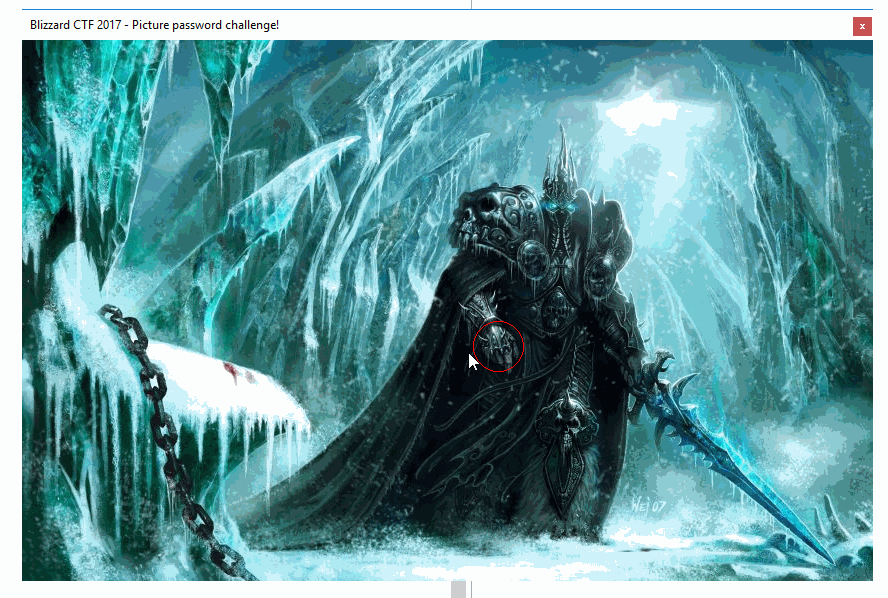
This challenge is inspired by the picture password login feature from Windows 8. When you run the challenge, you will be presented with a picture. Your goal is guess what are the 4 secret coordinates (hidden spots) in the picture that you should be clicking using the correct sequence. Once guessed correctly, a congratulatory message box is displayed. If you fail to guess the right 4 points coordinates, then you will see an error message.
This is a pure reverse engineering puzzle and therefore you won’t find any obfuscation or anti-debugging/reverse engineering tricks whatsoever. In the challenge, I left a bunch of hints to make it easy for others to solve the puzzle. Nonetheless, taking the brute-force approach leads to uncovering the hidden message, however this is not the proper solution I am expecting from participants.
Table of contents
How to use
- Download the challenge from here
- Unzip and run BlizzardLichKing.exe
- There are 4 hidden spots in the image
- Click on the image 4 times at random locations (click sequence makes a big difference)
- If you find the correct sequence you will get a nice message congratulating you
Note: You might need to download the Visual Studio C++ 2017 redistributable package from here.
Challenge goals
When the challenge was released, I provided 5 questions that can be answered as you make progress:
- What’s the general idea about the challenge and how it works behind the scene?
- What are the approximate locations / coordinates and their proper sequence that lead to successfully unscrambling the hidden message?
- If you were given another binary with different coordinates and secret message, can you generically crack it (or at least with little efforts and manual intervention)?
- Any cool stuff you appreciated in the challenge or any other things that were not directly obvious?
- Did you find any Easter eggs or hints in the binary?
Important note: revealing the hidden message without giving the coordinate sequence is an acceptable solution but not the preferred one.
Walkthrough
I am aware that there are multiple ways to approach and solve this challenge, however I will show you the solution that fulfills all of the 5 challenge goals above.
Getting started
My favorite tools for most RE tasks is IDA Pro. Let’s load the binary in IDA and see what we get:

IDA detected two possible ways to load the file:
- .NET assembly file
- PE64 file
From this we can conclude that this is a mixed mode C++ program. It contains both managed (MSIL) and native code.
In a mixed mode program, the .NET managed code executes first, therefore let’s load the file as a .NET assembly and see what we get:

Unless you are a .NET IL assembly language expert, it is better to use one of the free .NET decompilers (such as Telerik’s JustDecompile or dnSpy for instance).
Inspecting the managed code
In this section, we will take a look at the decompiled C# code. Let’s find the main() function in the decompiled output of dnSpy by expanding the “{}-” node and then the “<Module>” node where the main function is found:
internal static int main(string[] args)
{
  <Module>.FreeConsole();
  MyForm frm = new MyForm();
  int i = 0;
  if (0 < args.Length)
  {
    do
    {
      if (args[i] == "WhereAmI")
      {
        frm.ShowCoords = true;
      }
      else if (args[i] == "ShowItToMe")
      {
        frm.ShowFirstPoint = true;
      }
      else if (args[i] == "Cred1ts")
      {
        MessageBox.Show("This challenge has been created by Elias Bachaalany @0xeb!");
      }
      i++;
    }
    while (i < args.Length);
  }
  Application.Run(frm);
  return 0;
}
From the code above, we learn that there are 3 secret command line arguments: WhereAmI, ShowItToMe and Cred1ts.
Let’s now dive into the MyForm code and see how the ShowCoords and ShowFirstPoint boolean member variables are used.
The ShowCoords variable seems to display the mouse coordinates in the form’s title. This is useful for precision clicking / remembering the exact coordinates where you clicked as you debug the code:
private void pictureBox1_MouseMove(object sender, MouseEventArgs e)
{
  if (this.ShowCoords)
  {
    this.Text = string.Format("{0} - {1} {2}", this.Title, e.X, e.Y);
  }
}
Let’s inspect the executable’s managed resources (also using dnSpy) and in particular the embedded picture (in order to extract its dimensions):

After saving the picture and looking at its header, we can tell that it is a JPEG picture. Open it and inspect its dimensions (using your favorite picture viewer):
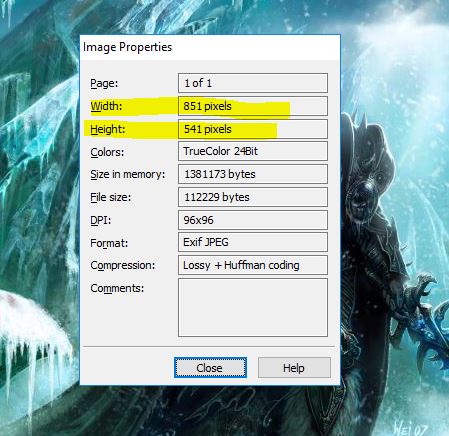
- WIDTH = 851
- HEIGHT = 541
Going back to the main() function, the ShowFirstPoint variable is used inside a timer callback. When timer_1 elapses and when ShowFirstPoint is specified, one hard-coded coordinate is queued into the m_points list:
private int CX0 = 543;
private int CY0 = 175;

private void timer1_Tick(object sender, EventArgs e)
{
  if (this.ShowFirstPoint)
  {
    this.ShowFirstPoint = false;
    Point item = new Point(this.CX0, this.CY0);
    this.m_points.Add(item);
  }
  ...
}
Is it safe to assume that CX0 and CY0 are valid first coordinates? For now yes, since we had to guess the secret argument ShowFirstPoint, which apparently serves as a hint to help the reverse engineer.
Who else queues coordinates in the list?
private void pictureBox1_MouseUp(object sender, MouseEventArgs e)
{
  if (!this.timer2.Enabled)
  {
    Point this2 = new Point(e.X, e.Y);
    this.m_points.Add(this2);
  }
}
When the user clicks on the picture, the MouseUp event does not immediately check for the validity of the coordinate. Instead, it just queues the point coordinates.
Let’s take a look at the remaining code in the timer1 handler:
private void timer1_Tick(object sender, EventArgs e)
{
  if (this.ShowFirstPoint)
  {
     ...
  }
  else if (this.m_points.Count != 0)
  {
    Point pt = this.m_points[0];
    this.m_points.RemoveAt(0);
    if (this.m_coll.Count == 0)
    {
      int v;
      if (Math.Sqrt(Math.Pow((double)Math.Abs(this.CX0 - pt.X), 2.0) + Math.Pow((double)Math.Abs(this.CY0 - pt.Y), 2.0)) < 25.0)
      {
        v = 1;
      }
      else
      {
        v = 0;
      }
      this.b_pass1 = (v != 0);
    }
    this.pictureBox1.CreateGraphics().DrawEllipse(Pens.Red, pt.X - 25, pt.Y - 25, 50, 50);
    ulong e2 = (ulong)((ulong)((long)(pt.X + 1981)) << 32);
    ulong encoded_pt = (ulong)(((long)(pt.Y + 17) | (long)e2) ^ -6148914692668172971L);
    this.m_coll.Add(encoded_pt);
    if (this.m_coll.Count == 4)
    {
      this.timer2.Enabled = true;
      this.timer1.Enabled = false;
    }
  }
}
We can see that timer1 checks to see if there are queued points, then it:
- Dequeues a point
- Checks if the m_coll list was still empty
- If it is empty, the code checks the distance between the first point clicked against the hard-coded initial coordinate (CX0, CY0).
- If the distance is within 25 pixels range, then b_pass1 is set to true.
- If (CX0, CY0) is the center of the circle, then any point within a 25 pixel radius passes the check.
- So the first correct coordinate is around the circle with radius R=25 and center C(543, 175)
- Draws an ellipse with width=height=50 having the x and y coordinates of the upper-left corner of the ellipse 25 pixels away from the clicked point. Because width and height are equal, DrawEllipse() draws a circle.
- The drawn circle’s center is at (x, y)
- If the point (x,y) is a correct coordinate, then many more points around it are also valid. In theory, the total valid points would be equal to the area of the circle: 3.14 * 25^2 == 1962.5 possible correct coordinates for each point.
- Encodes the (x, y) into a 64-bit number. This encoding is used to create extra work for the reverse engineer. Coordinate encoding as a 64-bits number follows this formula:unsigned __int64 encoded_pt = (((pt.X + 1981) << 32L) | (pt.Y + 17)) ^ 0xAAAAAAAA55555555i64
- When 4 points are collected and encoded, the first timer (timer1) is disabled and the second timer (timer2) is enabled
- This is a nice technique to make the coordinate checks code a bit asynchronous and out of order.
- This forces the reverse engineer to look elsewhere in order to understand how the coordinates checks work.
What we learned so far:
- Coordinates are collected into a list and de-queued from a timer callback
- The timer callback draws a circle with its center set to the clicked coordinates
- Each coordinate (up to 4) is encoded and queued as a single 64-bit integer into another list (m_coll)
Let’s now see how m_coll is used and how the remaining 3 points are checked:
private unsafe void timer2_Tick(object sender, EventArgs e)
{
  this.timer2.Enabled = false;
  if (this.b_pass1)
  {
    StringBuilder s = new StringBuilder();
    int i = 0;
    int c = this.m_coll.Count;
    if (0 < c)
    {
      do
      {
        s.AppendFormat("{0:X16}", this.m_coll[i]);
        i++;
      }
      while (i < c);
    }
    byte* this2 = s.ToString();
    if (this2 != null)
    {
      this2 = (ulong)RuntimeHelpers.OffsetToStringData + this2;
    }
    char* wch = this2;
    string hidden_message = new string(<Module>.native_verify(wch));
    if (hidden_message.Length != 0)
    {
      MessageBox.Show(hidden_message.Replace("@", "\r"), "Congratulations!");
      goto IL_AA;
    }
  }
  MessageBox.Show("Sorry, invalid sequence, please try again!");
  IL_AA:
  this.m_coll.Clear();
  this.b_pass1 = false;
  this.pictureBox1.Refresh();
  this.timer1.Enabled = true;
}
Timer2 callback checks to see if b_pass1 is true and if not, it immediately displays a message saying that the clicked coordinates are wrong. Now we can confirm that indeed, the first point (CX0, CY0) is the correct first point.
If the first coordinate is correct (whether set using the command line hint or guessed correctly), then all the coordinates are serialized into a string in hexadecimal form and then passed to a native method called native_verify. The native verification function returns a Unicode string on success or an empty string on failure.
This concludes our investigation in the managed code part. The next step is to locate and reverse engineer the native function native_verify.
Inspecting the native code
In the first part of this walk-through, we mentioned that we can disassemble the program in two different ways. Let us disassemble the file once more but this time let’s select the “Portable Executable for AMD64 (PE)” file loader.
The next step is to locate the entry point of the native function native_verify. Using dnSpy, we can click on the native_verify function which is called from the timer2 callback to get the metadata associated with this function:
// Token: 0x06000051 RID: 81 RVA: 0x000017FC File Offset: 0x00000BFC
[SuppressUnmanagedCodeSecurity]
[MethodImpl(MethodImplOptions.Unmanaged | MethodImplOptions.PreserveSig)]
internal unsafe static extern char* native_verify(char*);
We can then use the “File Offset” value given by dnSpy and use IDA’s “Jump/Jump to file offset” menu item to locate the native_verify entrypoint:
.text:00000001400017FC                         ; WCHAR *__fastcall native_verify(wchar_t *encoded_coords)
.text:00000001400017FC                         native_verify proc near
.text:00000001400017FC ; DATA XREF: .pdata:ExceptionDir↓o
.text:00000001400017FC
.text:00000001400017FC                         lpWideCharStr= qword ptr -58h
.text:00000001400017FC                         cchWideChar= dword ptr -50h
.text:00000001400017FC                         var_48= dword ptr -48h
.text:00000001400017FC                         num= qword ptr -40h
.text:00000001400017FC                         buf= byte ptr -38h
.text:00000001400017FC                         var_10= qword ptr -10h
.text:00000001400017FC                         var_8= byte ptr -8
.text:00000001400017FC
.text:00000001400017FC                         ; __unwind { // __GSHandlerCheck
.text:00000001400017FC 4C 8B DC                mov     r11, rsp
.text:00000001400017FF 49 89 5B 10             mov     [r11+10h], rbx
.text:0000000140001803 49 89 6B 18             mov     [r11+18h], rbp
.text:0000000140001807 49 89 73 20             mov     [r11+20h], rsi
.text:000000014000180B 57                      push    rdi
.text:000000014000180C 48 83 EC 70             sub     rsp, 70h
.text:0000000140001810 48 8B 05 31 EF 09 00    mov     rax, cs:__security_cookie
.text:0000000140001817 48 33 C4                xor     rax, rsp
.text:000000014000181A 48 89 44 24 68          mov     [rsp+78h+var_10], rax
.text:000000014000181F 33 C0                   xor     eax, eax
.text:0000000140001821 48 8B D9                mov     rbx, rcx
.text:0000000140001824 33 D2                   xor     edx, edx; Val
.text:0000000140001826 89 44 24 30             mov     [rsp+78h+var_48], eax
.text:000000014000182A 49 8D 4B C8             lea     rcx, [r11-38h]; Dst
.text:000000014000182E 44 8D 40 22             lea     r8d, [rax+22h]; Size
.text:0000000140001832 E8 6B 1D 00 00          call    j_memset
.text:0000000140001832
.text:0000000140001837 48 8D 7C 24 30          lea     rdi, [rsp+78h+var_48]
.text:000000014000183C BE 04 00 00 00          mov     esi, 4
.text:0000000140001841 48 8D 2D B8 E7 FF FF    lea     rbp, cs:140000000h
.text:0000000140001841
.text:0000000140001848
.text:0000000140001848                         loc_140001848:
.text:0000000140001848 ; CODE XREF: native_verify+113↓j
.text:0000000140001848 41 B8 10 00 00 00       mov     r8d, 16; MaxCount
.text:000000014000184E 48 8D 4C 24 40          lea     rcx, [rsp+78h+buf]; Dst
.text:0000000140001853 48 8B D3                mov     rdx, rbx; Src
.text:0000000140001856 E8 E5 37 00 00          call    sub_140005040
.text:0000000140001856
.text:000000014000185B 4C 8D 44 24 38          lea     r8, [rsp+78h+num]
.text:0000000140001860 48 8D 15 31 57 00 00    lea     rdx, Format; "%llx"
.text:0000000140001867 48 8D 4C 24 40          lea     rcx, [rsp+78h+buf]; Src
.text:000000014000186C E8 CB 01 00 00          call    sub_140001A3C
After scrolling a bit in the function, I observed various calls leading to function pointers with no apparent indications on how those pointers get initialized. These function pointers could be part of the native code or they could be function pointers in the managed code.

Let’s take the function sub_140005040 for example which is called from 0x0000000140001856:
.nep:0000000140005040                         sub_140005040   proc near
.nep:0000000140005040 ; CODE XREF: native_verify+5A↑p
.nep:0000000140005040 EB 08                        jmp     short loc_14000504A
.nep:0000000140005040
.nep:0000000140005042 0F 0B                        ud2
.nep:0000000140005042
.nep:0000000140005044 FF 25 BE B6 09 00            jmp     cs:qword_1400A0708
.nep:000000014000504A
.nep:000000014000504A                   loc_14000504A:
.nep:000000014000504A ; CODE XREF: sub_140005040↑j
.nep:000000014000504A FF 25 C0 B6 09 00            jmp     cs:qword_1400A0710
.nep:000000014000504A
.nep:000000014000504A                   sub_140005040   endp

.data:00000001400A0708 06 00 00 06 00 00 00 00 qword_1400A0708 dq 6000006h
.data:00000001400A0710 06 00 00 06 00 00 00 00 qword_1400A0710 dq 6000006h
That stub function jumps into qword_1400A0710 which has the value 0x6000006. This value is the function token id. We can search for that function in dnSpy:
// Token: 0x06000006 RID: 6 RVA: 0x000017E4 File Offset: 0x00000BE4
internal unsafe static int wcsncpy_s<17>($ArrayType$$$BY0BB@_W* _Destination, char* _Source, ulong _Count)
{
  return <Module>.wcsncpy_s(_Destination, 17UL, _Source, _Count);
}
The function sub_140001A3C, from the way it is used, looks like the sscanf function.
The function sub_140005000 is a managed function with token id == 0x6000003, which resolves to:
// Token: 0x06000003 RID: 3 RVA: 0x000010A0 File Offset: 0x000004A0
internal unsafe static uint Marvin32_Hash(void* buf, ulong len, ulong seed)
There are no more mysterious functions called from native_verify. Let’s now try to understand the algorithm.
Coordinate verification algorithm
The native_verify function receives the encoded coordinates (as we learned from the managed code side):
; WCHAR *__fastcall native_verify(wchar_t *encoded_coords)
The following code clearly decodes the coordinates:
native_verify+4C                           @@next_coord:
native_verify+4C   ; CODE XREF: native_verify+113↓j
native_verify+4C   41 B8 10 00 00 00       mov     r8d, 16; MaxCount
native_verify+52   48 8D 4C 24 40          lea     rcx, [rsp+78h+buf]; Dst
native_verify+57   48 8B D3                mov     rdx, rbx; Src
native_verify+5A   E8 E5 37 00 00          call    wcsncpy_s_0
native_verify+5A
native_verify+5F   4C 8D 44 24 38          lea     r8, [rsp+78h+num]
native_verify+64   48 8D 15 31 57 00 00    lea     rdx, Format; "%llx"
native_verify+6B   48 8D 4C 24 40          lea     rcx, [rsp+78h+buf]; Src
native_verify+70   E8 CB 01 00 00          call    sscanf
native_verify+70
native_verify+75   48 8B 44 24 38          mov     rax, [rsp+78h+num]
native_verify+7A   48 B9 55 55 55 55 AA AA+mov     rcx, -6148914692668172971
native_verify+84   48 33 C1                xor     rax, rcx
native_verify+87   48 83 C3 20             add     rbx, 32
native_verify+8B   4C 8B D0                mov     r10, rax
native_verify+8E   48 89 44 24 38          mov     [rsp+78h+num], rax
native_verify+93   49 C1 EA 20             shr     r10, 20h
native_verify+97   41 81 EA BD 07 00 00    sub     r10d, 1981; X coordinate
native_verify+9E   44 8D 48 EF             lea     r9d, [rax-17]; Y coordinate
At the end of the code snippet above, the registers r10d and r9d will contain the user clicked X and Y coordinates respectively.
We can replicate the coordinate decoding function in Python like this:
def decode_coords(s):
    for i in range(0, 4):
       idx = i * 16
       n = int(s[idx:idx+16], 16) ^ 0xAAAAAAAA55555555

       x = (n >> 32) - 1981
       y = (n & 0xffffffff) - 17

       print("%16X -> x = %d y=%d" % (n, x, y))
Let’s continue with the function:
native_verify+A2   B8 65 83 F5 4E          mov     eax, 4EF58365h
native_verify+A7   41 8D 49 32             lea     ecx, [r9+50]
native_verify+AB   F7 E9                   imul    ecx
native_verify+AD   C1 FA 08                sar     edx, 8
native_verify+B0   8B C2                   mov     eax, edx
native_verify+B2   C1 E8 1F                shr     eax, 31
native_verify+B5   03 D0                   add     edx, eax
native_verify+B7   69 C2 3E 03 00 00       imul    eax, edx, 830
native_verify+BD   2B C8                   sub     ecx, eax
native_verify+BF   B8 65 83 F5 4E          mov     eax, 4EF58365h
native_verify+C4   4C 63 C1                movsxd  r8, ecx; IDX1
native_verify+C7
native_verify+C7   41 8D 4A 19             lea     ecx, [r10+25]
native_verify+CB   F7 E9                   imul    ecx
native_verify+CD   C1 FA 08                sar     edx, 8
native_verify+D0   8B C2                   mov     eax, edx
native_verify+D2   C1 E8 1F                shr     eax, 31
native_verify+D5   03 D0                   add     edx, eax
native_verify+D7   69 C2 3E 03 00 00       imul    eax, edx, 830
native_verify+DD
native_verify+DD   42 0F B6 94 85 A0 62 00+movzx   edx, byte ptr ss:rva tbl2[rbp+r8*4]
native_verify+E6   2B C8                   sub     ecx, eax
native_verify+E8   48 63 C1                movsxd  rax, ecx; IDX2
native_verify+EB   0F B6 8C 85 A0 62 00 00 movzx   ecx, byte ptr ss:rva tbl2[rbp+rax*4]
native_verify+F3   0F AF D1                imul    edx, ecx
native_verify+F6   41 69 C1 53 03 00 00    imul    eax, r9d, 851
native_verify+FD   41 03 C2                add     eax, r10d
native_verify+100  48 63 C8                movsxd  rcx, eax
native_verify+103
native_verify+103  32 94 29 90 00 03 00    xor     dl, (tbl1 - __IMAGEBASE)[rcx+rbp]
native_verify+10A  88 17                   mov     [rdi], dl; key[i] = v
native_verify+10C  48 FF C7                inc     rdi
native_verify+10F  48 83 EE 01             sub     rsi, 1
native_verify+113  0F 85 33 FF FF FF       jnz     @@next_coord
With the passed X and Y, we see additional arithmetic operations taking place. X & Y, after some transformation, are used to read from tbl2 to compute an 8-bits key value (let’s call it pk) into the dl register and the linear coordinate value into rcx.
The pk value is then XORed with tbl1[linear_pt==rcx]. The resulting value is a single byte of the decryption key.
Looking back in the disassembly, we see that rsi is initialized with 4 == key size, rdi is a 4 bytes buffer containing the key computed based on the X, Y coordinates and the tables tbl1 and tbl2.
native_verify+3B   48 8D 7C 24 30          lea     rdi, [rsp+78h+key]
native_verify+40   BE 04 00 00 00          mov     esi, 4; KEY SIZE
native_verify+45   48 8D 2D B8 E7 FF FF    lea     rbp, __IMAGEBASE
Before delving into too much details, we know one correct coordinate (CX0=543, CY0=175). Since at native_verify+103 is where the decryption key is computed based on the coordinates, let’s do a small experiment and insert a non-breaking conditional breakpoint with the following IDC expression:
auto tk = Byte(LocByName("tbl1")+rcx);
Message("i=%d x=%d y=%d xy=%08X pk=%02X tk=%02X -> %02X\n", 4 - rsi, r10d, r9d, rcx, dl, tk, tk ^ dl);
Recap:
- tk = tbl1[rcx]. Rcx is computed from Y*WIDTH+x
- pk = Hash(X, Y, tbl2) & 0xff
- key[i] = tk ^ pk

The assumption would be that if we click anywhere around (CX0, CY0) within 25 pixels radius, we should get the same decryption key value:

All the 4 points were within 25 pixels of the first correct point. The key value was 0x15 for all of the coordinates. Let’s repeat the experiment with another set of coordinates near (CX0, CY0):

This observation leads to an important revelation about the algorithm:
- The correct key value is repeated near the correct coordinate
- If we try to compute the key for all coordinates, we should reveal all the valid spots because they have the same decryption key
Understanding the hashing function
The following code takes the (X,Y) values and returns a byte, basically acting like “Hash(X, Y) -> uint8_t”.
native_verify+A2   B8 65 83 F5 4E          mov     eax, 4EF58365h
native_verify+A7   41 8D 49 32             lea     ecx, [r9+50]; Y + 50
native_verify+AB   F7 E9                   imul    ecx
native_verify+AD   C1 FA 08                sar     edx, 8
native_verify+B0   8B C2                   mov     eax, edx
native_verify+B2   C1 E8 1F                shr     eax, 31
native_verify+B5   03 D0                   add     edx, eax
native_verify+B7   69 C2 3E 03 00 00       imul    eax, edx, 830
native_verify+BD   2B C8                   sub     ecx, eax
native_verify+BF   B8 65 83 F5 4E          mov     eax, 4EF58365h
native_verify+C4   4C 63 C1                movsxd  r8, ecx; IDX1
native_verify+C7
native_verify+C7   41 8D 4A 19             lea     ecx, [r10+25]
native_verify+CB   F7 E9                   imul    ecx
native_verify+CD   C1 FA 08                sar     edx, 8
native_verify+D0   8B C2                   mov     eax, edx
native_verify+D2   C1 E8 1F                shr     eax, 31
native_verify+D5   03 D0                   add     edx, eax
native_verify+D7   69 C2 3E 03 00 00       imul    eax, edx, 830
native_verify+DD
native_verify+DD   42 0F B6 94 85 A0 62 00+movzx   edx, byte ptr ss:rva tbl2[rbp+r8*4]
native_verify+E6   2B C8                   sub     ecx, eax
native_verify+E8   48 63 C1                movsxd  rax, ecx; IDX2
native_verify+EB   0F B6 8C 85 A0 62 00 00 movzx   ecx, byte ptr ss:rva tbl2[rbp+rax*4]
native_verify+F3   0F AF D1                imul    edx, ecx
native_verify+F6   41 69 C1 53 03 00 00    imul    eax, r9d, 851
native_verify+FD   41 03 C2                add     eax, r10d
native_verify+100  48 63 C8                movsxd  rcx, eax
The compiler used a technique called “division by invariant integers using multiplication” to achieve the division/modulo operation. If you had the Hex-Rays decompiler, you should see something like this:
// .rdata:00007FF7051162A0 ; int tbl2[830]
unsigned char Hash(int x, int y)
{
    return (tbl2[(x + 25) % sizeof(tbl2)] * tbl2[(y + 50) % sizeof(tbl2)]) & 0xff;
}
The key is then computed as such:
native_verify+F6   41 69 C1 53 03 00 00    imul    eax, r9d, 851 ; WIDTH*Y
native_verify+FD   41 03 C2                add     eax, r10d ; EAX = WIDTH*Y + X
native_verify+100  48 63 C8                movsxd  rcx, eax ; ECX = linear_pt
native_verify+103
native_verify+103  32 94 29 90 00 03 00    xor     dl, (tbl1 - __IMAGEBASE)[rcx+rbp] ; dl ^ tbl1[lin_pt]
native_verify+10A  88 17                   mov     [rdi], dl; key[i] = v
native_verify+10C  48 FF C7                inc     rdi
native_verify+10F  48 83 EE 01             sub     rsi, 1
native_verify+113  0F 85 33 FF FF FF       jnz     @@next_coord
And in pseudo-code, the key[i] value is compute as:
unsigned char key[4];
for (int i=0;i<4;i++)
{
  int linear_pt = pt[i].y * WIDTH + pt[i].x;
  key[i] = Hash(pt[i].x, pt[i].y, tbl2) ^ tbl1[linear_pt]
}
From the usage of the tbl1 array, we can deduce that this table should be big enough to hold all the pixels in the picture. Let’s inspect its size in IDA:
.data:00007FF705140090                         ; _BYTE tbl1[460391]
.data:00007FF705140090 6B 58 F2 35 AB 39 B3 0A+tbl1 db 6Bh, 58h, 0F2h, 35h, 0ABh, 39h
.data:00007FF705140090 26 1A 53 9D 4F 39 6B 37+; DATA XREF: native_verify+103↑r
The size 460391 is really WIDTH*HEIGHT == 851 * 541.
Scrolling further in the rest of the function, we see a decryption loop using the computed 4 bytes key followed by a hash check (using the Marvin function):
...
decryption loop
...
native_verify+1C5  49 B8 EB 00 81 19 17 04+mov     r8, 417198100EBh; seed
native_verify+1CF  48 8B D6                mov     rdx, rsi; len
native_verify+1D2  48 8B CF                mov     rcx, rdi; buf
native_verify+1D5  E8 2A 36 00 00          call    Marvin32_Hash
native_verify+1D5
native_verify+1DA  3D 82 4A 85 70          cmp     eax, 70854A82h ; Check for the correct hash
native_verify+1DF  75 34                   jnz     short loc_7FF6981D1A11
When the message is decrypted, if its hash does not match the value 0x70854A82 then an empty message is returned. Otherwise, the decrypted string is returned in Unicode:
native_verify+1E1  48 8D 2D FC F1 09 00    lea     rbp, unk_7FF698270BE0
native_verify+1E8  C7 44 24 28 D2 00 00 00 mov     [rsp+78h+cchWideChar], 0D2h; cchWideChar
native_verify+1F0  44 8B CE                mov     r9d, esi; cbMultiByte
native_verify+1F3  48 89 6C 24 20          mov     [rsp+78h+lpWideCharStr], rbp; lpWideCharStr
native_verify+1F8  4C 8B C7                mov     r8, rdi; lpMultiByteStr
native_verify+1FB  33 D2                   xor     edx, edx; dwFlags
native_verify+1FD  33 C9                   xor     ecx, ecx; CodePage
native_verify+1FF  E8 6C 1B 00 00          call    j_MultiByteToWideChar
Detecting the hidden spots in the picture
We now have an understanding of the key generation algorithm. Basically, for each (X, Y) coordinate, if they are part of a correct hidden spot, then we should have the same decryption key.
What if we compute the key for all the coordinates in the picture, trying to see what key each coordinate reveals?
If a coordinate belongs the the correct hidden spot, then we should see a bunch of sequential bytes containing the same values. We can use that trick to reliably guess all the hidden spots.
Here’s a pseudo-code of what I want to achieve:
def find_hidden_spots(encrypted_pixels, decrypted_pixels):
    # encrypted_pixels (tbl1) and decrypted_pixels are arrays with size = [WIDTH * HEIGHT]

    lin_pt = 0
    for y in range(0, HEIGHT):
        for x in range(0, WIDTH):
            decrypted_pixels[lin_pt] = Hash(x, y, tbl2) ^ encrypted_pixels[lin_pt]
            lin_pt += 1
When find_hidden_spots() returns, the decrypted_pixels array should contain a bunch of random bytes (for the incorrect coordinates) and a bunch of consecutive bytes having the same value (in a circular pattern when visualized) revealing the hidden spots (but not their correct click sequence of course).
After that, I want to iterate over the decrypted_pixels array and replace all the equal consecutive byte values with the value 1 and the non-equal bytes with 0. This will aid in the visualization of the hidden spots.
To demonstrate some IDA features, I opt to using this hashing algorithm as a blackbox algorithm. Basically, the goal is to implement both find_hidden_spots() and marking the equal consecutive bytes in IDAPython during a debugging session.
To do that, I need:
- The Hash(x, y, tbl2) function code
- Access to tbl1 (encrypted_pixels) and a work buffer to store the decrypted_pixels
We are going to use IDA’s Appcall feature:
//
// Initialize the needed Appcall prototypes
//
Appcall.set_appcall_options(0)

WIDTH  = 851
HEIGHT = 541
RADIUS = 25

VirtualAlloc = Appcall.proto(LocByName("kernel32_VirtualAlloc"), "unsigned __int64 __fastcall x(unsigned __int64 lpAddress, unsigned __int64 dwSize, unsigned __int32 flAllocationType, unsigned __int32 flProtect);")
CopyMemory = Appcall.proto(LocByName("ntdll_RtlCopyMemory"), "void __fastcall x(unsigned __int64 Dest, unsigned __int64 Src, unsigned __int64 Size);")
GetModuleHandle = Appcall.proto(LocByName("kernel32_GetModuleHandleA"), "unsigned __int64 __fastcall x(unsigned __int64 lpModuleName);")

base = GetModuleHandle(0).value
Now, let’s allocate a work buffer for the decrypted_pixels storage:
bitmap = VirtualAlloc(0, WIDTH * HEIGHT, Appcall.Consts.MEM_COMMIT, Appcall.Consts.PAGE_READWRITE)
print("Allocated memory for the the bitmap at %X" % bitmap.value)
Then let’s allocate writable executable memory to hold the hashing algorithm + custom ASM code to iterate over all the pixels:
algo = VirtualAlloc(0, 4*1024, Appcall.Consts.MEM_COMMIT, Appcall.Consts.PAGE_EXECUTE_READWRITE)
print("Allocated memory for the algorithm %X" % algo.value)
idc.RefreshDebuggerMemory()
Here’s the handwritten custom ASM driver code that calls the hashing function for all pixels:
[bits 64]
xor r9, r9 ; Y
xor r10, r10 ; X
xor rax, rax ; last value

main:
   .next:
  ; save work registers
  push r9
  push r10
  push rdi
  push rax

  call algo ; returns value in DL
  ; pop work registers
  pop rax
  pop rdi
  pop r10
  pop r9

  ; check for repeating bytes
  cmp ah, dl
  setz al
  stosb

  mov ah, dl ; remember previous value

  ; ++x
  inc r10
  cmp r10, 851 ; WIDTH
  jl .next

  ; x = 0
  xor r10, r10
  ; ++y
  inc r9

  cmp r9, 541 ; HEIGHT
  jl .next

  ret

algo:
  ; unsigned char __usercall algo@<dl>(unsigned __int64 base@<rbp>,unsigned __int32 x@<r10d>, unsigned __int32 y@<r9d>)
  algo:
Basically, the code above is position independent shellcode. It iterates over all the pixels and calls the Hash() function which is located just after this driver code.
Let’s use NASM to assemble this code:
nasm -f bin -o code.bin code.asm
Now let’s copy the driver code + the hash function into the remote memory we just allocated:
ea = algo.value

# Copy the driver code
f = open(r'code.bin', 'rb')
t = f.read()
f.close()

idaapi.put_many_bytes(ea, t)
ea += len(t)

# Copy part of the hash (algo) function
f = LocByName('native_verify') + 0xA2
sz = 0x10A - 0xA2
CopyMemory(ea, f, sz)
PatchDbgByte(ea + sz, 0xC3)            # Append a return instruction
Note how I appended a RET instruction after copying the hash function’s body from “native_verify+A2” to “native_verify+0x10A“.
The last step is to create an Appcall prototype for the driver code that has been written into the process memory:
decrypt_keys = Appcall.proto(algo.value, "void __usercall x(unsigned __int64 base@<rbp>, unsigned __int64 buf@<rdi>);")
The decrypt_keys remote function takes the image base (in the RBP register) and a work buffer as big as WIDTH*HEIGHT (in the RDI register).
Let’s now dump the hidden spots by calling the decrypt_keys() function and then visualize the returned buffer as a bitmap with just two colors: black and red:
from PIL import Image
def get_key_bitmap():
    decrypt_keys(base, bitmap.value)
    b = idaapi.get_many_bytes(bitmap.value, WIDTH*HEIGHT)
    return [ord(x) for x in b]

def dump_key_bitmap():
    bitmap = get_key_bitmap()
    i = 0
    img = Image.new('RGB', (WIDTH, HEIGHT), "black")
    pixels = img.load()
    for h in range(0, HEIGHT):
        for w in range(0, WIDTH):
            pixels[w, h] = (0xFF if bitmap[i] != 0 else 0, 0, 0)
            i += 1

    img.save(r'spots.bmp')
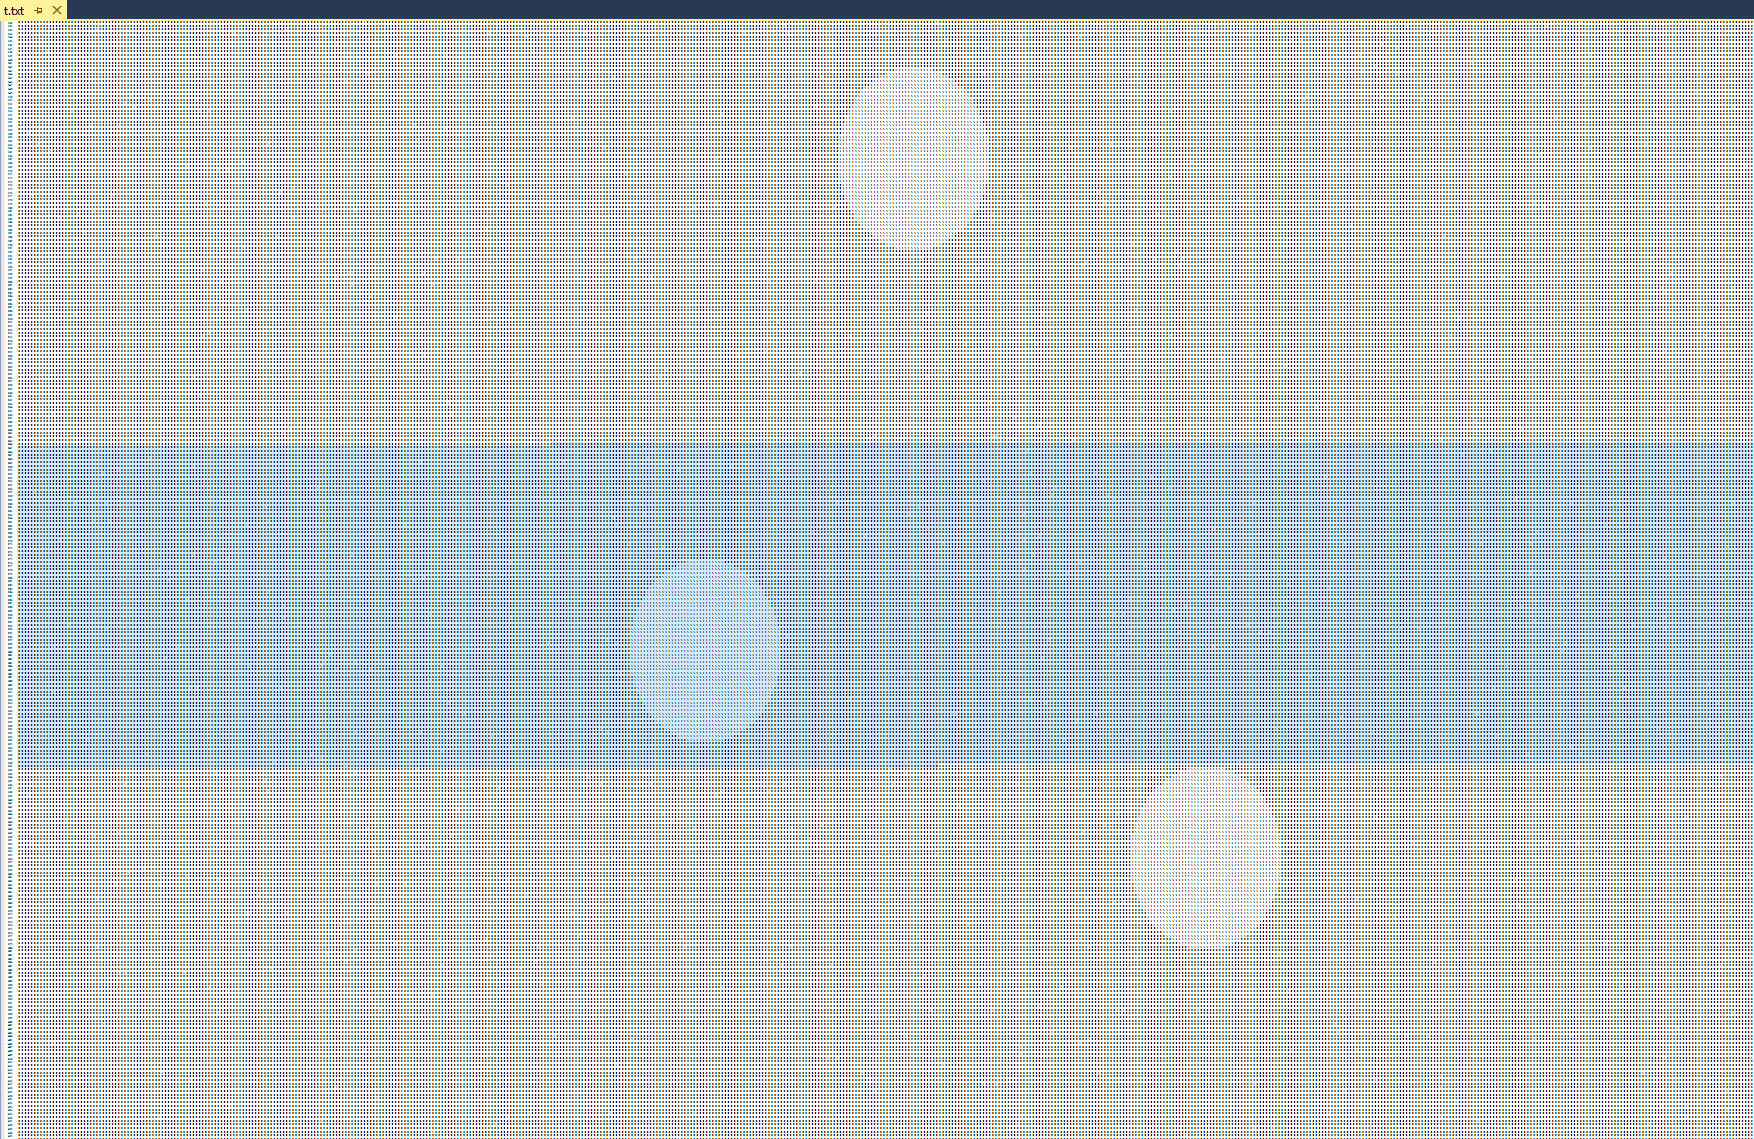
Note that I am using the Python image library to visualize the resulting decrypted pixels. The resulting picture looks like this:

Note how we have some tiny red dots, but the real hidden spots are clearly visible as bigger circles. Now, we can re-use the dump_key_bitmap() function for any hidden spots configuration in any future similar challenge.
We can also reveal the hidden spots in ASCII:
def get_pixel_pt(bitmap, x, y):
    lin_pt = (y * WIDTH) + x
    return 0 if lin_pt >= LIN_PT_MAX else bitmap[lin_pt]


def dmp_txt(bitmap):
    for y in range(0, HEIGHT):
        line = []
        for x in range(0, WIDTH):
            line.append(str(get_pixel_pt(bitmap, x, y)))

        print "".join(line)

dmp_txt()
The last required to solve this challenge is to figure out the click order of the hidden spots. We know that the first spot is the top red dot. We are left with 3 other permutations / possibilities. Basically the total number of permutations is 3 factorial == 6 tries. We can brute-force the 6 tries by calling the native_verify() until it returns a non-empty string.
Guessing the right points sequence
Guessing the right points sequence is the last step in solving this problem. Before we can do that, we need to write a function that finds the circles in the bitmap:
def get_sum(bitmap, x, y, radius, tp=2):
    xsum = 0
    ysum = 0
    if tp & 1:
        xsum = sum([get_pixel_pt(bitmap, i, y) for i in range(x-radius, x+radius)])
    if tp & 2:
        ysum = sum([get_pixel_pt(bitmap, x, i) for i in range(y-radius, y+radius)])

    return (xsum, ysum)


def find_spots(bitmap):
    y = -1
    points = []
    while y < HEIGHT:
        y += 1
        x = -1
        while x < WIDTH:
            x += 1

            if     (x - RADIUS < 0) or (x + RADIUS >= WIDTH) \
               or  (y - RADIUS < 0) or (y + RADIUS >= HEIGHT):
               continue

            xsum, ysum = get_sum(bitmap, x, y, RADIUS, 1)

            if xsum < DIAMETER-5:
                continue

            print("Center at (%d, %d)" % (x, y))

            points.append((x, y))

            # Skip to next spot. Algorithm assumes one hidden spot per row
            x += RADIUS
            y += RADIUS

    return points


points = find_spots(get_key_bitmap())
When we run it, we get:
Python>points = find_spots(b)
Center at (537, 157)
Center at (470, 290)
Center at (631, 346)
Center at (134, 372)
Python>points
[(537, 157), (470, 290), (631, 346), (134, 372)]
Notice how the first point is very close to C0(543, 175). To find out the correct sequence, we can call the native_verify() and exercise all the possible permutations:
import itertools

native_verify = Appcall.proto(idc.LocByName('native_verify'), 'unsigned __int64 __fastcall x(WCHAR *);')

def encode_coords(points):
    s = ''
    for x, y in points:
       n = (((x + 1981) << 32) | (y + 17)) ^ 0xAAAAAAAA55555555
       s += "%16X" % n
    return s

def find_right_combination(points):
    for p in itertools.permutations(points):
        s_ptr = native_verify(Appcall.unicode(encode_coords(p)))
        s = get_strlit_contents(s_ptr.value, -1, ASCSTR_UNICODE)
        if s is not None and (len(s) != 0):
            print("Found correct coordinates: %r -> %s" % (p, s))


find_right_combination(points)
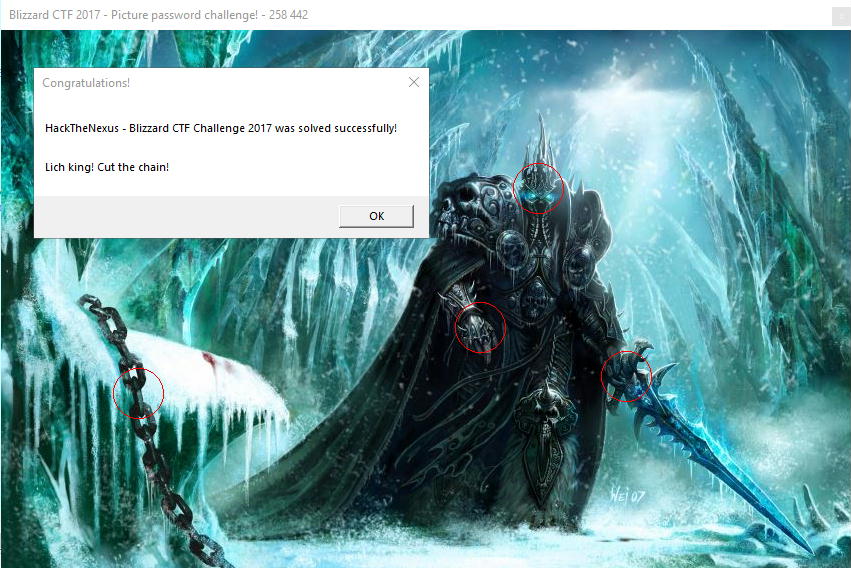
And we get:
Found correct coordinates: ((537, 157), (470, 290), (631, 346), (134, 372)) -> HackTheNexus - Blizzard CTF Challenge 2017 was solved successfully!@@@Lich king! Cut the chain!
Finally, the puzzle is solved! You can download the IDAPython script snippet used in this article from here.
Challenge goals revisited
Let’s go over the initial challenge goals and answer the questions:
- What’s the general idea about the challenge and how it works behind the scene?
- The challenge binary was a mixed mode program. Part of the algorithm is in the managed code and the rest is in the native code. Parts of the 4-bytes secret key are encoded at all the valid coordinates in the bitmap. The correct key for a given spot (with a radius of 25 pixels) contains the same byte value. This is a big tell; this is how we can generically guess where the hidden spots are. We cannot tell their sequence though, instead just where the hidden spots are. This knowledge reduces the brute-force space from 2^24 to Factorial(Number_of_Hidden_Spots – 1) (given that the first point is given).
- What are the approximate locations / coordinates and their proper sequence that lead to successfully unscrambling the hidden message?
- The following sequence of points are the approximate locations of the hidden spots:
(537, 157), (470, 290), (631, 346), (134, 372)
- The following sequence of points are the approximate locations of the hidden spots:
- If you were given another binary with different coordinates and secret message, can you generically crack it (or at least with little efforts and manual intervention)?
- Yes, the methodology described in this write-up is generic. All we have to do is locate the native_verify() function and find where tbl1 and tbl2 exist. We can then call these function to get the solution: find_right_combination(find_spots(get_key_bitmap()))
- Any cool stuff you appreciated in the challenge or any other things that were not directly obvious?
- I wrote the challenge, so it is hard to objectively answer this question. I enjoyed while designing the puzzle and the key encoder actually (the program that generates the encrypted pixels table).
- What I assume not to be very obvious to others is what is the relationship between the clicked coordinates and the correct key bytes. Solving the problem generically and uncovering the hidden spots bitmap is cool.
- Did you find any Easter eggs or hints in the binary?
- The only Easter eggs worthwhile mentioning are the hidden command line arguments which gave the first correct coordinate.
Other solutions
When I released the challenge to the public, a few people participated:
- The occasional trolls I guess: I received some messages on Twitter, not sure if they were trolling me. They said: “Yeah sure, we ran the strings.exe utility and the hidden message is: ‘Congratulations’. Your challenge was lame, it took me two minutes!”
- Lucas G: He solved the challenge the same day and put this write-up here: https://lucasg.github.io/2017/11/11/Solving-BlizzardCTF-Challenge/
- I liked how Lucas used detailed descriptions, good illustrations and how he used WinDbg’s SOS extension to debug and get metadata from the managed code
- The coordinates he shared were: (543, 175), (568, 175), (567, 191), (535, 196). They seem to work to decrypt the message, but they are not the right solution
- He wrote a mouse clicker to test his solution. Cool!
- Axel ‘0vercl0k’ Souchet, found some free time and solved this challenge a few days later. He called his solution “King No More”
- He found the following coordinates that compute the right decryption key: (x = 550, y = 165), (x = 1, y = 489), (x = 2, y = 209), (x = 1, y = 17)
- Unfortunately, these are not the real hidden spots coordinates
Thanks for taking part in this CTF. If you find mistakes in this write-up or have questions then please let me know in the comments below.
[…] Appcall during runtime and query the challenge function […]